Rebuilding my website with Eleventy
This website began life as a typical personal homepage in the mid-2000s. Having dabbled with WYSIWYG programs for a few years prior, I had finally started learning HTML and CSS. And it wasn’t long until I decided I needed my own domain name.
It was a static website because most websites were. At least the personal homepages I knew about. I eventually moved on to a DIY database-driven website using PHP. Then WordPress not long after that. I used WordPress during my freelancing years until I got my first full-time job as an “interactive designer.” I then scrapped my freelancer site and turned it into a web developer’s blog, christening it with its first post, Hard refresh.[1]
As part of that site rebuild, I moved away from WordPress and used a static site generator called Wok. But the creator abandoned it and I was getting tired of using it for… reasons. So, in 2019 I went crawling back to WordPress—a move for which I was so ashamed that I labelled it an “unpopular opinion,” despite the fact that a large part of the web runs on WordPress.
Well, um, I did it again.
WordPress is gone. This site is static once again, generated by the amazing Eleventy. This is a bit of a long post so here’s a little outline if you want to jump to specific sections.
Switching to static again
I just want to take this opportunity to say that you should feel free to do whatever you want on your own website and you are in no way required to justify it to anyone. I just enjoy nerding out about the reasoning. But I’m not trying to set a precedent that you need to defend any decisions you make about your own website.
Speed
Anyway, the single biggest reason for going static again is that my site was pretty slow when it was on WordPress. In particular, my web host is opinionated about how they set up their servers and they don’t make sacrifices to help WordPress run faster. There were things I could have done,[2] but they would be working against the infrastructure.
I didn’t want to switch hosts, and I certainly didn’t want to pay for specialized WordPress hosting. My server has lots of odds and ends on it and I like where it is and how it’s hosted now.
But static sites are fast. Instead of a bunch of running a bunch of PHP and database queries, all my server needs to do is send a file. Boom.
Ergonomics
I was scarcely using any of WordPress’ features—I was using the classic editor instead of blocks, authoring everything in markdown, and mostly ignoring categories and tags.
For a time, I did enjoy being able to easily make corrections to an article without needing a development setup. But these days I’m always with my development setup. Editing a markdown file feels right to me.
Longevity
I am a mere mortal. One day I will be gone. I would like to think that my website could outlive me. That would mean someone else would have to keep it running. That job becomes much easier if my website is a pile of HTML files.
Ok enough about the reasons.
Design
I re-coded the website from scratch. It’s a completely different website. But if I’ve done my job right, most people won’t notice. This was more a realignment than a redesign. But there are a few noteworthy changes.
I kept a super minimal homepage for years but I’m now experimenting with a busier design. I also rewrote my About page for the first time in years and added a sidebar with some silliness in it.
This project was my first time using CSS grid extensively. It helped me make layout decisions without feeling like I was positioning things arbitrarily. Hopefully it makes things feel more cohesive.
Writing more code-based tutorials is always a goal of mine (which I fail to meet often) so I wanted to make code samples extra nice this time around. Previously I used Highlight.js for that. But now I’m trying Torchlight, which highlights code when the site is built rather than in-browser. That’s a nice performance boost. Torchlight also results in more accurate highlighting and has annotation features.
As an accessibility measure, I also made it possible to toggle highlighting off. That’s useful if readers want more contrast or don’t want to read light-on-dark code samples when the site is in light mode.
I made a ton of tiny improvements. There were things that annoyed me previously—spacing around and in between elements, font-sizes in certain cases, color tweaks. Lots of things. It’s my favorite type of CSS to write. Tiny details that make things feel right.
Cool URIs don’t change
The W3C guilted me into making sure that all of my old WordPress permalinks worked on my new site. For journal articles that wasn’t a problem as I was using the format /journal/post-slug for the permalink and that is also what I’m using on the new site. But for hard-to-explain WordPress reasons all of my individual microblog posts also had the format /journal/post-slug. But on the new site I wanted all individual microblog posts to live under the /microblog path.
To achieve this I ended up using PHP to query my WordPress database and programmatically generate a .htaccess file that includes a 301 redirect for every single microblog post. After adding those and a handful of manual one-off redirects like my RSS feeds, I ended up with over 950 redirects. I have no idea if that is going to cause a problem for Apache but I guess we’ll find out.
Eleventy buildout
I have a few sections on my site. My main blog is my Journal. That’s a folder of markdown, which is straightforward.
I also have some one-off pages which are easy peasy to set up with Eleventy.
On the other hand, I have a microblog that compiles posts from my Mastodon account, posts from my Statuslog, and asides—untitled short posts—into one unified feed. This took a bit of work but fortunately Eleventy has flexible features that make this kind of data wrangling possible.
I’m using some Node scripts to hit the Mastodon and omg.lol APIs, then distilling that data down into a couple of JSON data files. Eleventy’s ability to create pages out of any kind of data is a killer feature. And using its collections system, I’m able to put statuslogs, toots, and asides together into one collection I call my microblog and paginate through them.
Search
One WordPress feature I lost was search. I had a few options for replacing it. My server still runs PHP so I considered doing some kind of server-side search implementation. Another option was to use JavaScript to implement search functionality on the client-side.
I ended up choosing a middle-ground approach. I discovered the little JS package MiniSearch via Cory’s excellent article about how he implemented search on his Eleventy site. I took that approach but instead of in-browser search, I’m exposing a search endpoint on a cloud function. More on that in a bit.
The search form
The search form is perfectly functional without JavaScript.
1<form class="search-form" action="https://duckduckgo.com" method="get" 2 @submit.prevent="search"> 3 <label> 4 <span class="sr-only">Search:</span> 5 <input type="search" name="q" placeholder="Search" 6 x-effect="getDuckDuckGoFallback" x-model="query"> 7 </label> 8 9 <button type="submit">Search</button>10 11 <input type="hidden" placeholder="Search"12 name="sites" value="blakewatson.com">13</form>Because we’re submitting to DuckDuckGo, users without JavaScript will get sent there to see results. If JavaScript is enabled, Alpine takes over. Alpine is a great alternative to frameworks like Vue and React in situations where you don’t want a build step. In this case it catches the submit event and handles search itself and uses fetch to hit a custom endpoint.
The search index
To search my site, regardless of whether it’s in-browser or on a custom endpoint, I need a search index.
An Eleventy template is usually one input file (e.g., my-page.md) that produces one or more output files (e.g., my-page.html).
But a killer feature of Eleventy is just how many different types of template formats it can process out of the box. One such template is a special JavaScript file ending in .11ty.js. You export a class. You can specify frontmatter data by returning an object from a data method. Then you specify the output by returning a string from a render method.
I used it to create a search index of any content I wanted searchable. Here is the code with some of the minutia redacted.
1class SearchIndex { 2 data() { 3 return { 4 permalink: '/search-index.json', 5 }; 6 } 7 8 render(data) { 9 const journal = data.collections.journal;10 const microblog = data.collections.microblog;11 const pages = data.collections.page;12 const project = data.collections.project;13 const work = data.collections.work;14 15 const index = [...journal, ...microblog, ...pages, ...project, ...work].map(16 (post, idx) => {17 18 // REDACTED logic stuff for brevity19 20 // object with all the fields I want to search on21 // along with fields I want to come back in the results22 return {23 id: post.id || post.fileSlug,24 title: post.data.title,25 url:26 type === 'microblog'27 ? `/microblog/${post.data.microblogId}`28 : post.url,29 date: post.date,30 dateDisplay: post.data.dateDisplay || '',31 text: post.content,32 microblogText: type === 'microblog' ? post.content : '',33 summary: post.data.summary || '',34 emoji: post.emoji || '',35 type,36 };37 },38 );39 40 return JSON.stringify(index);41 }42}43 44module.exports = SearchIndex;In short, I’m grabbing all the different collections I have and smushing them into one big array. Then I am returning that whole thing as a JSON string. This will write the file search-index.json which is hosted alongside the rest of my website.
The search endpoint
Then I implemented a search endpoint on a Cloudflare Workers function. If the visitor has JavaScript enabled, I use fetch to hit the worker, passing the search term as a query parameter. If JavaScript isn’t available, the search form falls back to POSTing to DuckDuckGo, where it will perform a search against my website for the given query.
Back to the cloud function. This won’t be a full tutorial on Workers,[3] but just to give you an idea of what I’m doing I will show you a few relevant pieces. This bit of code involves retrieving the search index.
1let searchIndex = await env.STORAGE.get('search-index'); 2let data = []; 3 4if (!searchIndex) { 5 const resp = await fetch(indexUrl, {method: 'GET'}); 6 data = await resp.json(); 7 await env.STORAGE.put('search-index', JSON.stringify(data), { expirationTtl: 60 * 60 * 24 }); 8} else { 9 data = JSON.parse(searchIndex);10}First, I attempt to retrieve the search index from my worker’s KV storage, which is roughly equivalent to the browser’s localStorage. If it isn’t available I fetch it from my website. In that case, I also store the index and set it to expire in one day. This is a little nicety to speed up searches since it eliminates an extra network request that would otherwise be required.
Next, I set things up for searching by creating an instance of MiniSearch. I specify which fields I want to search on, and which fields I would like to be returned back to me in the such results. Then I give it the search index data.
1const minisearch = new MiniSearch({ 2 // fields to search 3 fields: [ 4 'title', 'url', 'date', 'text', 'summary', 'type' 5 ], 6 // fields to return 7 storeFields: [ 8 'title', 'url', 'date', 'dateDisplay', 'emoji', 'microblogText', 'summary', 'type' 9 ],10});11 12minisearch.addAll(data);Finally, I execute the search, get the results, and return them.
1const results = minisearch.search(query);2 3return new Response(JSON.stringify(results), {4 headers: {5 "Content-Type": "application/json",6 'Access-Control-Allow-Origin': allowedOrigin(env)7 },8});Back on my website, I display the results. I wanted to be able to filter results by collection (journal, microblog, page, etc) so I include a series of checkboxes above the search results. To wire that up I used Alpine to re-render the results based on what collections are checked.
Bringing back comments. Sort of.
It’s been about a decade since I ran a blog with comments. I never got many of them and most discussion, if any occurred at all, would happen on social media. I dropped support for comments happily and haven’t really thought about it since.
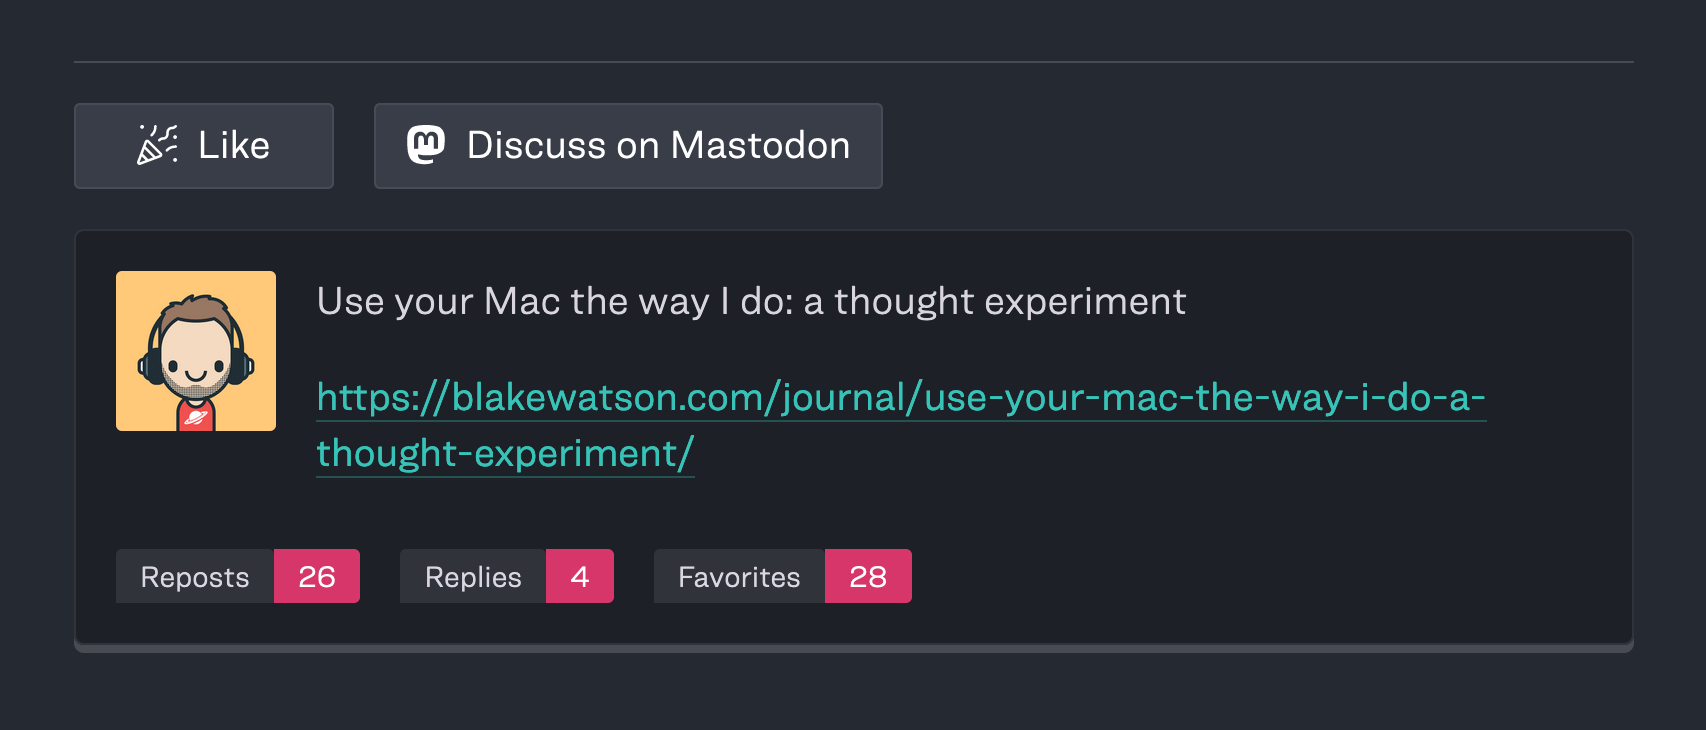
But lately I miss having a bit of interaction. So this time around I decided to implement two ways for people to interact with my articles. A “like” button, and a link to a corresponding post on Mastodon.
As a way to make the link to Mastodon more interesting, I’m showing a stylized preview of the post at the end of my article by using the mastodon-post web component from David Darnes.
Homemade like button
I feel like I’ve seen a bunch of these bespoke like buttons recently and I thought it would be fun to implement one.
Since I already had a Workers function that I was using for search—and it was already using KV storage—I decided to use the same function to handle the backend aspect of the like button functionality.
My <like-button> is a custom web component. Once it’s loaded on the page it uses the article’s slug and fetches the number of likes from the worker function. Just to show a quick snippet, here is the code in my worker that gets the likes from KV storage.
1async function getLikes(env, key) {2 let val = await env.STORAGE.get(`likes-${key}`);3 val = val ? parseInt(val) : 0;4 5 return new Response(val, {6 status: 200, headers: { 'Access-Control-Allow-Origin': allowedOrigin(env) }7 });8}As I said, Workers KV is similar to localStorage in the browser. So it is just a matter of storing the number of likes for each article and retrieving them when requested. If I don’t find a value, I use zero. If there are any likes on an article, I display a count next to the like button itself.
When someone clicks the like button, I fetch the current number of likes (if any exist), increment that number, and put it back in storage.
1async function handleLike(env, key) { 2 let val = await env.STORAGE.get(`likes-${key}`); 3 4 val = val ? parseInt(val) + 1 : 1; 5 await env.STORAGE.put(`likes-${key}`, val); 6 7 return new Response(val, { 8 status: 200, headers: { 'Access-Control-Allow-Origin': allowedOrigin(env) } 9 });10}On the frontend I put a little value in localStorage to track whether the user has liked the given article. Sadly this means you can’t spam the like button to inflate my ego. Well, I guess you can if you use a private window or clear localStorage. If you’re willing to do all that then you deserve to smash that like button as much as you want.
Automatic microblog publishing
As I said, the microblog consists partially of posts from Mastodon and my omg.lol Statuslog. I’ve set up a workflow that automatically catches new posts from those sources and publishes them to my site.
The magic that makes this possible is good ol’ RSS. I’m using the fancy new service, EchoFeed from Robb Knight, to monitor my Mastodon and Statuslog feeds. When a new post appears on one of them, EchoFeed sends a request to a webhook I set up.
The webhook parses the data in the request and extracts the URL of the social posts. Leaving out error-checking for brevity, it looks something like this.
1// Get the JSON input from the request body 2$json_input = file_get_contents('php://input'); 3 4// Decode the JSON data 5$data = json_decode($json_input, true); 6 7// get the post url 8$link = $data['link'] ?? null; 9 10// save the url to a text file to be processed later11file_put_contents(PATH_TO_QUEUE, $link . PHP_EOL, FILE_APPEND);The URLs end up in a text file with one URL per line. Meanwhile, I have a cron task that runs every hour that checks that text file. A Node script runs and finds new posts using the Mastodon API and the Statuslog API. It extracts the data I want from them and then it updates two global data files I’m using, toots.json and statuslogs.json. The script commits and pushes the changes.
When a new commit is pushed to main branch, it gets picked up by DeployHQ (referral link), the service I use for website deployments. DeployHQ will run my Eleventy build, which processes those JSON data files and adds the posts to my site. Finally DeployHQ grabs the output of the build and transfers it to my server.
Cloudflare CDN
Moving from WordPress to a static site improved the speed of my website by an order of magnitude (at least when it comes to uncached pages[2:1]). But I knew anyone not located in the US might have a slow connection to my US-based server. I decided to experiment with putting my site behind Cloudflare CDN.
It was a rocky start but once I figured things out I was happy with the results. My site feels pretty speedy even if I connect to VPN on the other side of the world. I’m also interested in playing with Bunny CDN but it seems the integration process is a bit less straightforward than Cloudflare, so I need some time to research.
Personal websites for the win
That’s the whirlwind tour of my site rebuild. I love working on my website. This quote from James’ Coffee Blog comes to mind:
One of my favourite things to do in my free time is to tinker with this website. Indeed, this website is the culmination of years of tinkering. I have added features like coffee shop maps that I can share with friends, a way for me to share my bio in two languages, a sitemap.xml file to help search engines find pages on my website, and more.
This is from his article 100 things you can do on your personal website. I enjoy tinkering and I enjoy reading about everyone else’s tinkering. Every personal website is a win for the web and proof that we don’t need large corporate content silos to connect with each other.
So if you’ve written about your website, let me know! And thank you for reading about mine. Long live web1.
Appendix: Stuff I used for building my site
- NearlyFreeSpeech.NET - old school pay-as-you-go web host
- Eleventy - static site generator
- markdown-it-anchor - on-page heading links
- markdown-it-table-of-contents - shortcode for auto-generating a table of contents based on heading structure
- Cloudflare Workers - JavaScript cloud functions. I also use Workers KV for storage.
- Cloudflare CDN - CDN to speed up requests
- Backblaze B2 - site backup
- Alpine.js - reactive UI library
- DeployHQ (referral link) - site deployment SaaS
- Torchlight - code syntax highlighting
- Hoefler&Co - webfonts Ringside Regular, Ringside Extra Wide, and Operator Mono
- Font Awesome - I’m using a few icons here and there
I have screenshots of all of my old designs in that post. In many ways, learning about design has made my website more boring over the years. Where is the creative experimentation? The whimsy? ↩︎
I did use caching. The excellent HyperCache plugin is the only reason my site was navigable. Page loads on non-cached pages could take several seconds to load. You don’t need to email me about how my host was definitely doing something wrong. It’s all about tradeoffs. You can run WordPress fast, but you have to make tradeoffs to get there. ↩︎ ↩︎
Although I do want to write a tutorial now that I’ve used Workers for a handful of projects. ↩︎